These very lovely mellow colours are for the final Gingersnap Creations Colour challenge this year - yes, it is the final challenge of 2011!
May I introduce you to my New Year's angel? She is a lovely stamp from the Octopode Factory. I stamped her on white slightly textured card, cut her out and coloured her with Koh-i-noors and Copics. The background for the card is from Temari 09 whereby I only used part of the background image to keep the background colour very soft and mellow. I modified the background by stamping various snowflakes with white ink and covering them with superfine glitter. The finishing touches are some white lace and letters from BoBunny.
Just pop over to the Gingersnap blog for more wonderful mellow yellow and white creations, hope you will join us for the final challenge of 2011! Petra.
Thursday 29 December 2011
Friday 23 December 2011
Silver Sparkly Tag
Last minutes makes ... a tag inspired by Nancy
I tea-dyed a manila tag and then embossed it with the Tim Holtz snowflake embossing folder which I covered in distress ink beforehand. I quite like the effect of the double treatment ....
I layered the tag with lace and gauze - patterend papers from Authentique and Fancy Pants - image and sentiment from PaperWhimsy. The little branches are cut with a Martha Stewart punch and glittered them with Stickles. The finishing touches are vintage lace sewn to the tag, vintage buttons and blings.
Merry Christmas to all of you, Petra.
Labels:
12daysofwhimsy,
challenge,
tag
Wednesday 21 December 2011
Sparkly Snowflake Cards
... as shown on the 5th Day of Whimsy. I made four cards using Nancy's instructions as inspiration and all of them turned out slightly different
All cards are slightly wider than A6, the patterned papers are from FancyPants and Kaisercraft and the images including the sentiments from PaperWhimsy. I used an EKSuccess punch to decorate the edges of the second paper layer and Nestabilities shapes to cut out the snowflakes and circles. All snowflakes are covered in lots of Stickles and so am I .... The stamp is by Stamper Anonymous, the little snowflake punch from Woodware. The cards are adorned with lace, button twine, blings, pearls and buttons, Petra.
Also linked to: Der/Die/Das Blog von Bawion
Labels:
12daysofwhimsy,
cardmaking
Friday 16 December 2011
Holidays & Ornaments
Last week we went for a short city break to Hamburg, Germany's biggest port. I hadn't been to Hamburg for about 20 years and was amazed how the city has developed (and still is) during the last years. We found an eclectic mix of new and old living very happily next to each other .... wonderful restaurants with fresh fish .... Christmas market stalls at almost each corner ... lots of very small and very big boats in the harbour to watch. The weather was not as friendly as we had hoped but there were always some very lovely cafes with wonderful coffees and delicious cakes (lol)
We will definitely return to Hamburg but on request of a gentleman only when it is a bit warmer (lol).
Before going on holiday I received all the wonderful Holiday Ornaments from the Gingersnap swap, thankls to Laura. All ornaments are absolutely stunning. Ladies, thank you so much.
We will definitely return to Hamburg but on request of a gentleman only when it is a bit warmer (lol).
Before going on holiday I received all the wonderful Holiday Ornaments from the Gingersnap swap, thankls to Laura. All ornaments are absolutely stunning. Ladies, thank you so much.
Saturday 10 December 2011
Christmas Sentiment
This is for Vicki's current challenge over at the Cheerful Stamp Pad: A Christmas Greeting. I have to admit it is not only a Christmas Greeting but also a greeting for the new year. It is German and in translation: Merry Christmas and a Happy New Year, Petra.
paper: BasicGrey, embossed wrapping paper - Cuttlebug embossing folder -
stamp: Heindesing - gold gel pen, blings, Stickles
Labels:
cardmaking,
cheerful stamp pad
Thursday 8 December 2011
Art 'n' Soul Christmas Tag - part two
This is part two of the last Art 'n' Soul challenge. Part one was to create a bookmark with lace, part two was: You must make a Christmas themed tag to go with your bookmark.
I kept the tag relatively simple as I wanted the image (from: On The House) to be the focal point. I cut the tag with Nestabilities Oval shapes (papers: October Afternoon, Echo Park). For the front I added the image which I printed and cut out. As adornment I added lots of glitter, little metallic stars, a little holly embellishment cut with Tim Holtz Holly die, Bakers Twine and little jingle bells. For the back of the tag I added a little stamped sentiment (stamps: Elzybells). Happy crafting, Petra.
Wednesday 7 December 2011
Sankt Nikolaus Mitten
Inspired by Nancy's tutorial for the 12 Days of Whimsy I created a Sankt Nikolaus mitten using burlap, tartan cotton fabric and felt. The image at the front is a Santa Claus from the Graphics Fairy which I had printed previously ... luckily because when trying to print a new image the printer cartridge was out of ink (sigh).
I cut the image and covered it with clear accents and added a little bit of glitter. The finishing touches are pompon and tartan ribbon and a little jingle bell. Petra.
Labels:
12daysofwhimsy,
challenge,
fabric,
felt
Tuesday 6 December 2011
Thank You
Oh oh, I am well behind with my posts (sigh) ... thank you for your patience, thank you for stopping by so often and for leaving all these wonderful comments
My Thank You card for the Gingersnap Creations 'Once in a Blue Moon' challenge. I very often make thank you notes or cards in batches. So they have to be relatively easy to put together. The base is a slightly textured A6 card. I stamped a paperbag image onto 7Gypsies paper and then cut out a wonderful rose from The Sum of All Crafts. The sentiment is printed and cut with a Nestabilities label.
Hop over to see all other wonderful creations from the Gingersnap DT, and hopefully you will join us, Petra. x
Labels:
cardmaking,
gingersnap creations
Saturday 3 December 2011
Victorian Rose Pennants
... for the Second Day of Whimsy. I have to admit, I am totally hooked. Nancy's tutorials are wonderful. They give so much inspiration but leave a lot of room for your own interpretation. And I am already itching to start today's creation. But first ... the Victorian Rose Pennants. I have not made a pendant beforehand and I learned a lot and enjoyed it
All parts of the pendant look quite similar but they are all slightly different. I cut Prima Marketing paper with Nestabilities in various shapes. The little Paper Whimsy ladies were printed, cut out and attached to the oval shapes. I added some old musical paper and found the rose at Digital Collage Sheets. As adornments I used lots of lace, little charms and some blings. When I had finished I thought it would be nice to do something with the back. I cut Kraftcard with the Nestabilities, distressed the edges and cut a little label.
Friday 2 December 2011
Whimsical Button Fairy
The First day of Whimsy ... Nancy created these fabulous button fairies ... and I enjoyed every minute creating the little fairy
Supplies:
images: paper whimsy - silver paper lace, buttons, silver wire,
paper flower, blings, nestabilities, jingle bell
images: paper whimsy - silver paper lace, buttons, silver wire,
paper flower, blings, nestabilities, jingle bell
The biggest challenge was to find a substitute for the beautiful silver doily Nancy used in her creation. After a bit of a search I found this neglected silver paper lace which I've had for a long time but never used. I cut it with a Quickutz scalloped circle die. Otherwise I followed Nancy's instructions, I only added a little jungle bell - for Christmas, Petra.
Labels:
12daysofwhimsy,
challenge,
ornament
Wednesday 30 November 2011
Lace Bookmark - part one
What a challenge! I very much enjoyed creating this bookmark for the last Art 'n' Soul swap of the year. It was a two part challenge and here is the first part. Viv gave us quite a list of requirements for this one:
"Make a BOOKMARK with a VINTAGE theme AND include LACE somewhere on the project - you can make the actual bookmark from any medium you wish providing it is sturdy enough to be used and adorn it any way you want to as long as it has a vintage/shabby chic theme!"
... and, of course, a bookmark should be relatively flat, should have sort of a reasonable size, .... this time I lost the battle for the flat bit ... the bookmark just evolved and developed and before I realized all these beads appeared (lol)
The base for the bookmark is patterend paper from Kaisercraft sandwiching some white card for sturdiness. I covered the paper with lace whereby the lace scallop defined the width of the bookmark. The centre piece is an image from ArtCult which I printed on canvas (the first time and it worked like a treat). After attaching the image I started to adorn the bookmark with more lace, white cutout lace flowers anhd free-hand stitching ... and then the beads appeared ... luckily because it looked a bit plain beforehand! Petra.
Monday 28 November 2011
Santa's Little Helper
... is wearing Santa's hat for Vicki's Cheerful Stamp Pad Challenge: Who's Wearing Santa's Hat? I wouldn't mind getting some presents from this little helper (lol)
Supplies:
paper: white card, EchoPark paper - stamp: High Hopes -
nestabilities, embossing folder, punch, ribbon, Stickles
paper: white card, EchoPark paper - stamp: High Hopes -
nestabilities, embossing folder, punch, ribbon, Stickles
Why not pop over to Vicki's blog enjoying more amazing creations from the DT and join in for this fun challenge, Petra.
Labels:
cardmaking,
cheerful stamp pad
Wednesday 23 November 2011
Yellow, Red and Brown
What a wonderful colour combination for the Gingersnap Creation Colour challenge, so warm and welcoming! And a perfect opportunity to play with some wax crayons and the iron. As I was not so sure how to go about I found this tutorial. For this technique you need wax paper and unfortunately I have only brown wax paper which would not show the colours so well. So I experimented with greaseproof paper which naturally doesn't give the same result as the papers do not stick together. When opening up the 'crayon sandwich', the melted crayons displayed a nice texture and colour combo
It is even possible to use dies to cut out shapes which I straight away used to create a little card for the colour challenge. I kept the layout relatively simple because I wanted to make the little cut-out leave the focal point
The base for the card is textured off-white card layered with Kraftcard and patterend papers from Jillibean Soup and Crate paper. The stamped word is from Elzybells, the button twine from the Ribbon Girl and the wooden pearls from my stash.
And as I had quite a bit of melted crayon paper I could not resist to make a couple more of these little cards whereby they are very similar but still each one is slightly different
Hope you join us for this wonderful challenge. Hop over to the Gingersnap blog for more fabulous inspiration, Petra.
Labels:
cardmaking,
gingersnap creations,
wax
Monday 21 November 2011
Who's Wearing Santa's Hat?
... a little sweet and yet so cheeky looking Santa with lots of Chritsmas toys
Supplies:
image: Bugaboo digital stamp - paper: My Mind's Eye, white card -
colouring: colouring pencils and Copics - Stickles, cotton wool, bakers twine, Nestabilities
Come and join us for this fun challenge over at the Cheerful Stamp Pad, Petra.
image: Bugaboo digital stamp - paper: My Mind's Eye, white card -
colouring: colouring pencils and Copics - Stickles, cotton wool, bakers twine, Nestabilities
Come and join us for this fun challenge over at the Cheerful Stamp Pad, Petra.
Labels:
cheerful stamp pad,
tag
Saturday 19 November 2011
Thomas the Tank Engine
It was a week full of cakes - little ones and big ones. On those occasions I am never quite sure which I like better ... making cakes or paper crafting. Luckily at times they do complement each other especially when some slightly tricky construction is involved like the chimney of a tank engine ... may I introduce you to Thomas?
... a moist vanilla sponge filled with strawberry jam and vanilla buttercream and covered with soft icing ..... have a great Sunday, Petra.
Labels:
cake
Wednesday 16 November 2011
Holiday Ornaments
.. for the Gingersnap Creations Art Exchange. I did enjoy it a lot and it got my right into the Christmas Spirit - creating four Holiday Ornaments in any shape but sized at least 2" x 2", it had to include some stamping and more than one layer. Every ornament is sort of similar but also slightly different. All of them have a decorated front and back. All of them consist of three layers of paper/card for the base. All shapes have been cut with Nestabilities apart from the snowflakes (Marianne Design) and holly (Tim Holtz Alterations).
The patterend papers are from JillibeanSoup, Kaisercraft and BasicGrey. Some of the little stars on the base layer in the front and the back are glittered with silver Stickles. The image of the two rather sweet coral singers is from The Graphic Addict, it is slightly raised with foam pads to give it some more depth. The ornament is decorated with organza ribbon, two little jingle bells, a snowflake and a glittered pearl. The stamps for the sentiment on the back is from Artistic Outpost, the stars from 7Gypsies.
This ornament evolved around an image from the Graphics Fairy ... I wanted to use it for a long time and it seemed to be perfect for this occasion. The design principle and supplies for this ornament are the same as for the previous one apart from using just Stickled pearls, some woollen lace and a little bell for decoration.
Hope everybody likes them and I cannot wait to see what everybody else created. Petra.
The patterend base papers are from Kaisercraft edged with Stickles. For the second layer I cut some cardboard which I crackled with dark red/green and cream acrylic paints (Lefranc & Bourgeois) and crackle paint (FolkArt). This created the frame for the stamped Santa Claus images (Tim Holtz). I decorated the ornaments with some bakers twine and a snowflake charm at the bottom. For the top of one ornament I die cut the holly leaves and embellished it with some gems asberries. The gems are covered in red Stickles. For the second ornament the snowflake was cut from patterend Kaisercraft paper for both front and back and glittered the front with Stickles. The finishing touch is a Kanban pearl.
The back is the same for both ornaments: patterend Kaisercraft paper, a stamped sentiment from Elzybells stamped onto patterend Kaisercraft paper.
For the remaining two ornaments I took a slightly different approach using vintage images and having the stamping only on the back ... hope this counts (lol)The back is the same for both ornaments: patterend Kaisercraft paper, a stamped sentiment from Elzybells stamped onto patterend Kaisercraft paper.
The patterend papers are from JillibeanSoup, Kaisercraft and BasicGrey. Some of the little stars on the base layer in the front and the back are glittered with silver Stickles. The image of the two rather sweet coral singers is from The Graphic Addict, it is slightly raised with foam pads to give it some more depth. The ornament is decorated with organza ribbon, two little jingle bells, a snowflake and a glittered pearl. The stamps for the sentiment on the back is from Artistic Outpost, the stars from 7Gypsies.
This ornament evolved around an image from the Graphics Fairy ... I wanted to use it for a long time and it seemed to be perfect for this occasion. The design principle and supplies for this ornament are the same as for the previous one apart from using just Stickled pearls, some woollen lace and a little bell for decoration.
Hope everybody likes them and I cannot wait to see what everybody else created. Petra.
Labels:
exchange,
gingersnap creations
Thursday 10 November 2011
Late Halloween Postcard
Late with posting here on my blog but hopefully not too late arriving at Chriss' doorstep ... for the Kindred Spirit Postcard swap. Chriss wanted to see bats on the postcard
The base for this postcard is again a watercolour-paper postcard which is brilliant when using lots of paint or ink ... lots of inking for the background with Distress inks ranging from scattered straw to fired brick and lots of stamping with Archival and Memento ink (stamps: Artistic Outpost, Elzybells). Hope there are enough bats on the postcard ... Petra.
Labels:
exchange,
kindredspirit,
postcards
Tuesday 8 November 2011
All Pink
I love pink but nevertheless this challenge from Craft Artwork was more than a challenge: to create a tag in pink. It took me a whole week to create something I am sort of happy with. I am not quite sure why ... maybe because we are supposed to use only pink (do you know how many different shades of pink there are?)? maybe because the weather is not bright and pink but rather dark and damp? I created several backgrounds with paper, paint, ink, ... and destroyed them. I cut and glued numerous images and destroyed them and in the end settled for something quite different to the initial - more subtle -plan (lol)
The tag is relatively small, the shape a nestabilities label. For the background I painted several layers of gesso, crackle and acrylic paint in various shades of pink trying to create some depth for the background. I stamped some script (Paperbag Studios) onto one half of the tag.
For the fhe focal point I created a little heart cut from some pink card and covered with beads of various shapes, sizes and shades of pink. More embellishments are ribbon with sequin hearts, pink glitter around the beaded heart and lots of varied ribbons and gauze for the top of the tag. Petra.
also linked to:
Let's Get Shabby challenge #29
Happy Daze November Challenge - An Explosion of Colour
Labels:
challenge,
craft artwork,
tag
Monday 7 November 2011
Christmas Tree
My first Christmas Tree ... this year .... made of paper ... not in my house yet ... there are still a few weeks to go (lol). The tree is for the current Cheerful Stamp Pad challenge: Trees
Supplies:
paper beads with October Afternoon papers - papers for card: October Afternoon -
bling, lace and ribbon from mys stash
paper beads with October Afternoon papers - papers for card: October Afternoon -
bling, lace and ribbon from mys stash
The Christmas Tree was assembled with paper beads which I created according the same principle as described in one of my previous post - except: I cut the paper into rectangular shapes and not triangles and then rolled the paper.
Pop over to Vicki's challenge, for more brilliant tree samples and show us your tree! Petra.
Labels:
cardmaking,
cheerful stamp pad,
paperbeads
Friday 4 November 2011
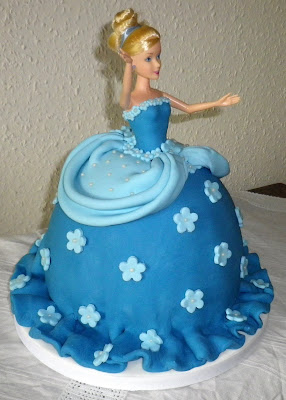
Cinderella Goes to the Ball
.. in her new ballroom dress
My first attempt of a Cinderella Birthday cake and just in case you would like to know how I made it:
The Cinderella doll was given to me by the Dad of the little lady who has birthday this weekend. I first considered buying a specific doll baking tin but as I wanted to fill the cake with jam and Buttercream I decided it would maybe be better to bake individual round cakes (8", vanilla sponge) and then do a bit of sculpting. Not really being into Barbie/Cinderella dolls myself I was really surprised to find that her legs are so extremely long! It took three sponges, some jam and Vanilla buttercream and a double layer of soft icing to match sort of the height between her feet and waist - just amazing - but I didn't want to take the legs off ... I heart it could be difficult to assemble them again (lol)
So once the cakes were ready for decorating a friend of mine came to give a helping hand in wrapping up the legs in cling film to stabilise the doll and to avoid her getting too messy and to cut the necessary hole in the middle of the sponges. After this I sculpted the cake, filled it and decorated the cake - which is always one of the best parts of the process.
The little princess and her family and friends will have to eat a lot of cake and I hope she likes it! Have a great weekend, Petra.
Labels:
cake
Thursday 3 November 2011
On The Farm ...
.... farm fresh carrots ... 50c a bundle
... with Jillibeansoup papers, Stampotique and Waltzing Mouse stamp, a carrot image from a children's colouring page, some printing, punching, colouring with colouring pencils and distressing.
Hope over to the Gingersnap Creations blog for the latest Chestnut Theme Challenge: Farm Fresh. You will see lots of fantastic DT samples and have the chance to join us! Petra.
Wednesday 2 November 2011
A Sketch and Some Cutting
This card was inspired by a sketch from the Quixotic Paperie and the challenge to use dies and punches for the ABC challenge by the Der/Die/Das Blog von Bawion
I started by covering an A6 card with Kaisercraft paper which I have had for a long time but strangely never used. For the top and bottom strip I built up layers of punched patterned paper (Martha Stewart and Stampin'Up), ribbon and little pearls (both from Kaisercraft). The rectangular shape in the sketch is represented by a stamped and embossed Waltzing Mouse baking label which I cut with Nestabilities - it is one of those stamps which have been designed to go perfectly with one of the Nestabilities labels! Instead of one round shape I created various layers with a patterned doilie, patterend paper, a Kaisercraft die-cut and an adorable image from MadebyJanet. To complete it I added some little pearls. Petra.
also linked to: Stamptacular Sunday
Labels:
bawion,
cardmaking,
challenge,
quixotic
Monday 31 October 2011
Autumn Time
I love Autumn with its wonderful vibrant colours, all the fresh and delicious fruits and vegetables to be harvested and the endless possibilities to go out and enjoy the fresh air and changing nature ... so many things to grateful for
Supplies:
papers: American Crafts - stamps: Waltzing Mouse - Nestabilities labels, Stampin'Up edge punch,
some little friendly wooden kites, some machine stitching
papers: American Crafts - stamps: Waltzing Mouse - Nestabilities labels, Stampin'Up edge punch,
some little friendly wooden kites, some machine stitching
To see more delightful Thanksgiving creations just pop over to Vicki's blog The Cheerful Stamp Pad. Hope you have time to join us. Petra.
Labels:
cardmaking,
cheerful stamp pad
Thursday 27 October 2011
Bags
To complement my daughter's wedding dress I made a little bag for her using the same fabrics as her dress and a wonderful pattern from Emma Brennan's book: Making Vintage Bags. It is a little crescent bag with a bit of a different handle
Labels:
bags
Subscribe to:
Posts (Atom)